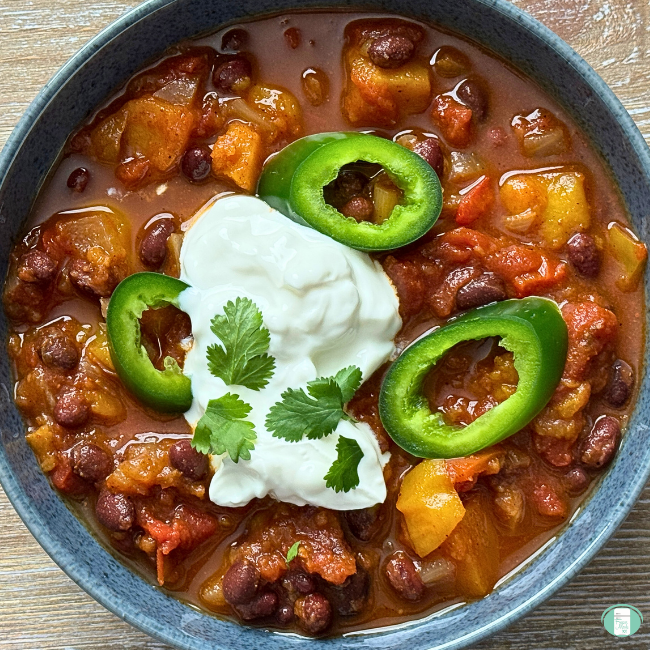
• Skip to main content
  • Skip to primary sidebar
  • About
    • Disclosure/PR
  • Freezer Meal Recipes
  • Freezer Meal Plans
  • Dump Recipes
  • Club Login

Freezer Meals 101

Less time cooking, more time living

vegetarian

Freezer Friendly Paneer Curry

By Sharla

The warm combination of spices found in Indian cuisine can’t be beat. But who has time to make a traditional Indian dinner from scratch on a busy weeknight? With the help of this make ahead paneer curry recipe, you can prep all the ingredients for your dinner ahead of time and freeze them until you’re ready to start cooking. That means you can enjoy a classic Indian dinner without all the extra work that comes along with preparing curry from scratch!bowl with peas and cubed paneer in sauce

The flavors of Indian cuisine are perfect in freezer meals such as this Paneer Curry, Chicken Tikka Masala, Butter Chicken, and Chana Masala.

Paneer Curry Recipe

Ingredients:

  • 400 grams paneer
  • 14 ounces diced tomatoes
  • 1/2 cup frozen peas
  • 1/4 cup chopped onion
  • 1 tablespoon ginger
  • 2 cloves minced garlic
  • 2 tablespoons curry paste
  • cilantro
  • salt and pepper
  • 1/2 cup Greek yogurt

For Day of Serving:

  • 1/2 cup Greek yogurt
  • cilantro

Assembly Instructions:

  1. Cut paneer into one inch pieces. Warm a skillet over medium heat. When the skillet is hot, add butter to the pan and sauté the paneer, flipping to sear all sides, which should take around 6-10 minutes. Season with salt and pepper, as needed.
  2. Continue searing the paneer in batches until all the pieces have been cooked. Pat the cooked paneer with a paper towel to remove excess grease, then allow the pieces to cool completely.
  3. Place the seared pieces in a large resealable bag, along with the diced tomatoes, peas, chopped onion, ginger, minced garlic, curry paste, cilantro and Greek yogurt.
  4. Squeeze the bag to mix the ingredients together. Remove excess air from the bag, then seal and freeze until you’re ready to start cooking.

clear bag with cubed paneer in a sauce in it

Cooking Instructions:

  1. Transfer the curry ingredients to the refrigerator to thaw overnight.
  2. Pour the contents of the bag in to a large skillet and cook over medium heat. Before serving, stir in 1/2 cup more Greek yogurt and top with fresh cilantro.

collage of photos of paneer dish from freezer meal to skillet to plate

What Is Paneer?

Paneer is a popular northern Indian ingredient. But if you’ve never had curry made with this delicious addition before, you may be wondering what it is. Paneer is a fresh cheese often found in Indian cuisine. The cheese is typically made by combining curdled milk with acidic fruit or vegetable juice, like lemon.

With its mild, milky flavor, paneer helps balance out the spices in a variety of classic Indian dishes, including curry and masala.

Do You Cook Paneer Before Putting It in Curry?

To bring out the flavor in the paneer, it’s a good idea to cook it for a few minutes before adding it to the rest of your curry ingredients. To cook the cheese, start by draining it from any excess liquid in the packaging. Then, sauté the peer in oil or butter until it’s golden on all sides. After that, it’s ready to add to your recipe!bowl with cubes of paneer and tomatoes and green peas

What to Serve with Paneer Curry?

This delicious curry recipe has everything you need for a complete meal. But if you want to round out your dinner with a few sides, try serving it with one of these traditional ideas:

  • Rice
  • Naan
  • Tandoori roti
  • Flatbread
  • Cucumber salad
bowl with cubes of paneer and tomatoes and green peas
Print
Paneer Curry
Prep Time
20 mins
Cook Time
10 mins
 
Course: Main Course
Keyword: vegetarian
Servings: 4
Ingredients
  • 400 grams paneer
  • 14 oz diced tomatoes
  • 1/2 cup peas frozen
  • 1/4 cup onion chopped
  • 1 tsp. ginger
  • 2 cloves garlic minced
  • 2 Tbsp. curry paste
  • cilantro
  • salt and pepper to taste
  • 1/2 cup Greek yogurt
For Day of Serving:
  • 1/2 cup Greek yogurt
  • cilantro for garnish
Instructions
Assembly Instructions:
  1. Cut paneer into one inch pieces. Warm a skillet over medium heat. When the skillet is hot, add butter to the pan and sauté the paneer, flipping to sear all sides, which should take around 6-10 minutes. Season with salt and pepper, as needed.
  2. Continue searing the paneer in batches until all the pieces have been cooked. Pat the cooked paneer with a paper towel to remove excess grease, then allow the pieces to cool completely.
  3. Place the seared pieces in a large resealable bag, along with the diced tomatoes, peas, chopped onion, ginger, minced garlic, curry paste, cilantro and Greek yogurt.

  4. Squeeze the bag to mix the ingredients together. Remove excess air from the bag, seal, and freeze.

Cooking Instructions:
  1. Thaw.

  2. Pour the contents of the bag in to a large skillet and cook over medium heat. Before serving, stir in 1/2 cup more Greek yogurt and top with fresh cilantro.

Filed Under: Freezer Meal Recipes, Freezer Meal Side Dishes, Freezer Skillet Meals Tagged With: vegetarian

Homemade Creamed Corn

By Sharla

Having a few delicious side dishes on hand is a great way to make meal prep a little easier. And when you combine corn with crispy bacon, you have a yummy side dish that’s sure to be a hit with the entire family. This homemade creamed corn recipe is so simple to prepare that it can be assembled and frozen in a matter of minutes. After that, all that’s left to do is reheat your creamy side dish when you’re ready to serve it for dinner.clear plastic bag filled with ingredients for homemade creamed corn on top and then the baked dish on bottomWe especially love having this at the ready for holiday meals. We’ve served it at Easter, Thanksgiving, and with our Christmas dinner.

Other make ahead holiday side dishes:

  • Maple Glazed Carrots
  • Make Ahead Stuffing
  • Garlic Mashed Potatoes

Homemade Creamed Corn Recipe

Ingredients:

  • 5 cups (750g bag) frozen kernel corn
  • 2 slices of cooked bacon, crumbled
  • 1 1/2 cups whipping cream
  • 2 tablespoons granulated sugar
  • 1 1/2 teaspoons salt
  • 1/2 teaspoon ground pepper
  • 3 tablespoons butter

For day of cooking:

  • ½ cup milk
  • 3 tablespoons flour

Assembly Instructions:

  1. Combine the frozen corn, cooked bacon, whipping cream, sugar, salt, pepper, and butter in a large freezer bag. Squeeze the ingredients together to combine the ingredients together.
  2. Remove excess air from the bag and seal to close.
  3. In a separate quart sized bag, add ¼ cup grated parmesan cheese. Staple the small bag to the larger bag above the seal.
  4. Freeze the ingredients until you’re ready to prepare the creamed corn casserole.

clear bag with corn and bacon and a smaller bag with shredded cheese

Cooking instructions:

  1. Transfer the creamed corn ingredients to the refrigerator to thaw overnight.
  2. Preheat the oven to 400 degrees.
  3. When the mixture is thawed, pour the contents of the bag into a large casserole dish.
  4. Whisk together the milk and flour in a small bowl. Pour the mixture into the casserole dish and stir to mix.
  5. Place the pan in the oven to bake for 25 minutes. Top with the parmesan cheese and return the pan to the oven and bake for another 10 minutes.

How Do You Store Homemade Creamed Corn?

This old-fashioned recipe makes a big batch of creamed, which means you may have a few leftovers when your dinner is over. To store your creamed corn, transfer the leftovers to an airtight container and store them in the refrigerator. They’ll stay good for up to four days when refrigerated.

You can reheat your creamed corn in the microwave or cook them in the oven at 400° until they’re warmed through.

How Long is Frozen Corn Good For?

To ensure your southern style creamed corn stays fresh in the freezer, it’s a good idea to store the ingredients in a freezer bag or airtight container. Before sealing the bag, make sure to remove as much air as possible to prevent freezer burn.

Before you place the creamed corn ingredients in the freezer, write the name of the recipe, the date of freezing and the expected expiration date on the bag. Your frozen creamed corn will stay good for up to three months when stored properly.

How Do You Make Creamed Corn Less Watery?

Since this recipe is made with frozen corn, you may notice that the casserole becomes watery as it cooks. The flour and milk mixture will help thicken the cream as your casserole bakes. But if your corn still seems too watery, you can add more flour or cornstarch to the pan to help thicken the sauce. Make sure to mix your flour or cornstarch with a little bit of milk before adding it to the baking dish to prevent clumps from forming.

Baked Creamed Corn Recipe Ideas

This baked creamed corn casserole recipe is sure to be a hit with your family – no matter when you serve it.  Whether you’re preparing it for a week night dinner or a holiday like Christmas or Thanksgiving, there are so many great reasons to whip up this dish! And with these variation and substitution ideas you can make your corn casserole even better.

  • Leave out the bacon. Mixing some bacon into your creamed corn is a great way to take the flavor up a notch. But if you’re looking for a more classic, old-fashioned recipe, the bacon can be left out. You may need to add a little bit more salt to the corn to help balance out the flavor of the other sweet ingredients. Omitting the bacon also makes this vegetarian.
  • Mix in more cheese. Add even more flavor to your corn casserole by mixing some cheese into the dish. Add shredded cheddar, Monterrey jack, or pepper jack cheese to the corn mixture to give it even more cheesy flavor.
  • Add some spice. Another easy way to enhance the flavor of your baked corn is with the help of some spiciness. You can give your casserole a little more spice by mixing in seasonings like ground cayenne or red pepper flakes. Or chop up some fresh jalapeno peppers to mix into the casserole with the corn.
  • Use canned corn. Since you’ll be freezing your creamy corn casserole before you bake it, using frozen corn make sense. But if you don’t have any on hand or prefer the flavor of canned corn, you can easily make the swap. In addition to using regular canned corn, you can also use a combination of corn kernels and canned creamed corn to give your casserole even more creamy texture.

baked cream corn in a white casserole dish

baked cream corn in a white casserole dish
Print
Homemade Creamed Corn
Prep Time
15 mins
Cook Time
35 mins
 
Course: Side Dish
Keyword: corn
Servings: 6
Ingredients
  • 5 cups kernel corn frozen
  • 2 slices bacon cooked and crumbled
  • 1 1/2 cups whipping cream
  • 2 Tbsp. granulated sugar
  • 1 1/2 tsp salt
  • 1/2 tsp ground pepper
  • 3 Tbsp. butter
For Day of Cooking:
  • ½ cup milk
  • 3 Tbsp. flour
Instructions
Assembly Instructions:
  1. Combine the frozen corn, cooked bacon, whipping cream, sugar, salt, pepper, and butter in a large freezer bag. Squeeze the ingredients together to combine.

  2. Remove excess air and seal.

  3. In a medium sized freezer bag, add ¼ cup grated parmesan cheese. Staple the small bag to the larger bag above the seal.

  4. Freeze.

Cooking instructions:
  1. Thaw.

  2. Preheat the oven to 400°.

  3. When thawed, pour the contents of the large bag into a casserole dish.

  4. Whisk together the milk and flour in a small bowl. Pour the mixture into the casserole dish and stir.

  5. Place in the oven to bake for 25 minutes. Top with the parmesan cheese and return the pan to the oven and bake for an additional 10 minutes.

Filed Under: Freezer Meal Recipes, Freezer Meal Side Dishes Tagged With: vegetarian

Freezer Friendly Moroccan Chickpea Stew

By Sharla

Serving meatless meals is a great way to save money while meal prepping. And when it comes to vegetarian recipes, you can’t go wrong with soup! This flavorful Moroccan chickpea stew is a delicious vegan dinner idea that’s sure to be a hit with your family. And since it’s made with chickpeas and tons of veggies, it’s also a hearty dinner you can prepare a head of time and freeze until you’re ready to start cooking.clear bag with stew in it and the stew cooking in crock potWe were visiting our son and his fiancé in Kamloops, British Columbia, Canada when we first heard of Moroccan Chickpea Stew. On a hotel restaurant menu, there were the usual egg dishes and pancakes and such, but we spotted something that seemed out of place, a vegetarian stew. The waitress assured us it was the best choice so my husband and I both ordered it, him with poached eggs on top and me without.

The waitress was absolutely right. It was flavorful and unique. The dish came with crusty bread on the side for dipping in the remaining sauce and we ate every last bite!

I was determined to develop my own version of the recipe so that we could add it into our freezer meal rotation and this is the resulting recipe. 

Moroccan Chickpea Stew Recipe

Ingredients:

  • 1 onion, chopped
  • 3 cloves garlic, minced
  • 1-2 sweet potatoes, cubed into 1 inch cubes
  • 19 ounces chickpeas, drained
  • 28 ounces diced tomatoes
  • 12 black Kalamata olives
  • 1 cup vegetable broth
  • 1 tablespoon brown sugar
  • 2 teaspoons cumin
  • 2 teaspoons curry powder
  • 1 teaspoon paprika
  • 1/2 teaspoon cinnamon
  • 1/2 teaspoon turmeric
  • 1/4 teaspoon cayenne pepper
  • salt and pepper to taste

Assembly Instructions:

  1. Combine the onion, garlic, sweet potatoes, chickpeas, diced tomatoes, olives, vegetable broth, brown sugar, cumin, curry powder, paprika, cinnamon, turmeric, cayenne, salt, and pepper in a large freezer bag. Squeeze the ingredients together to mix.
  2. Remove excess air from the bag and seal to close the bag. Freeze the ingredients until you’re ready to prepare the stew.

bright coloured stew in a clear bag

Cooking instructions:

  1. Transfer the soup ingredients to the refrigerator to thaw overnight.
  2. Pour the contents of the bag into a large stock pot or Dutch oven. Bring the liquid to a boil, then reduce heat and simmer until the onions are tender, between two to four hours.
  3. To cook the ingredients in the slow cooker, transfer everything to the bowl of the crockpot. Set to cook on high for four hours.

process of cooking chickpea stew in slow cooker and serving in a blue bowl

How Do You Store Moroccan Chickpea Stew?

Your family is going to love this flavorful soup, which means it’s perfect for leftovers. If you have soup leftover after dinner, it should be stored in the refrigerator. Transfer the leftovers to an airtight container and keep them in the fridge for up to five days.

To reheat your stew, place it in the microwave or heat the leftovers on the stovetop until they’re warmed through.blue bowl with chickpeas and cubed sweet potatoes on rice

Can I Freeze Cooked Stew?

Freezing the ingredients for your stew is a great way to speed up the prep work of your dinner. But if you want to make cooking even easier, you can also cook the stew before you freeze it.

Follow the instructions for cooking the stew on the stovetop or in the slow cooker. After the soup is cooked, remove the pan from the heat source and allow the stew to cool completely.

Once the ingredients are fully cooled, you can transfer them to an airtight container or freezer bag for storage.

When you’re ready to eat your frozen soup, make sure to thaw it safely in the refrigerator. After that, you can warm it up in the microwave for around two minutes. Or transfer the soup ingredients to a pan on the stovetop. Cook over medium low heat until the ingredients are warmed through.chickpea stew with cubes of sweet potatoes and black olives visible in slow cooker

How Long is Frozen Stew Good For?

This chick pea stew is perfect for meal prepping because all the ingredients are freezer friendly. When your stew ingredients are stored properly, they’ll stay good for up to six months when frozen. Make sure to store the ingredients in a freezer-safe bag or airtight container. Before sealing the bag, make sure to remove as much air as possible to prevent freezer burn.

Before you place the Moroccan stew ingredients in the freezer, don’t forget to write the name of the recipe, the date of freezing and the expected expiration date on the bag. That way, you’ll be sure to make your stew before it goes bad.

Can I Make Moroccan Stew with Dried Chickpeas?

Using canned chickpeas is a great way to speed up the prep work of your dinner. That’s because all you have to do is drain and rinse the canned beans before you combine them with the rest of your soup ingredients.

But if you don’t have any canned chickpeas or prefer to make your own from scratch, you can also use dried chickpeas to make your stew. Start by cooking the chickpeas according to the instructions on the package.

Once the chickpeas are cooked, make sure to allow them to cool completely. After that, you can combine the cooked beans with the rest of the stew ingredients before freezing them for later use.chunky stew with sweet potatoes, black olives, and chickpeas on rice in a bowl

What to Serve with Moroccan Chickpea Stew?

Since this delicious stew is made with a variety of veggies, it’s already packed with flavor. That means it can be difficult to know what to serve with your soup when dinner time rolls around. Try these side dish and topping ideas to create a full meal for your family’s dinner.

  • Rice
  • Quinoa
  • Lentils
  • Thick bread or Naan
  • Poached eggs
  • Yogurt or sour cream

Some of our other vegetarian freezer meals:

  • African Thai Stew
  • Chana Masala
  • Asian Rice Bowl
  • Chickpea and Vegetable Curry
  • Black Bean and Corn Enchiladas
blue bowl with chickpeas and cubed sweet potatoes on rice
Print
Moroccan Chickpea Stew
Prep Time
15 mins
Cook Time
2 hrs
 
Course: Main Course
Keyword: vegetarian
Servings: 4
Ingredients
  • 1 onion chopped
  • 3 cloves garlic minced
  • 1-2 sweet potatoes cubed into 1 inch cubes
  • 19 oz chickpeas drained
  • 28 oz diced tomatoes
  • 12 black Kalamata olives
  • 1 cup vegetable broth
  • 1 Tbsp. brown sugar
  • 2 tsp. cumin
  • 2 tsp. curry powder
  • 1 tsp. paprika
  • 1/2 tsp. cinnamon
  • 1/2 tsp. turmeric
  • 1/4 tsp. cayenne pepper
  • salt and pepper to taste
Instructions
Assembly Instructions:
  1. Combine the onion, garlic, sweet potatoes, chickpeas, diced tomatoes, olives, vegetable broth, brown sugar, cumin, curry powder, paprika, cinnamon, turmeric, cayenne, salt, and pepper in a large freezer bag. Squish to combine.

  2. Remove excess air, seal, and freeze.

Cooking instructions:
  1. Thaw.

  2. Pour the contents of the bag into a large stock pot or Dutch oven. Bring the liquid to a boil, then reduce heat and simmer until the onions are tender, between two and four hours.

Slow Cooker Instructions:
  1. Thaw. Cook on high for four hours.

Filed Under: Freezer Meal Recipes, Freezer to Crock Pot Tagged With: vegetarian

Pesto Minestrone

By Sharla

What better way to warm up after a cold day than with a hot bowl of soup? But prepping and cooking a batch of soup can be a time consuming process! With the help of this easy make ahead minestrone soup recipe, you can prep all the ingredients for your Italian soup ahead of time and freeze everything until you’re ready to start cooking. That means you can enjoy a delicious bowl of soup in a fraction of the time!freezer bag with soup, soup in a slow cooker, and then into a bowl

I love having soups in the freezer especially in winter. Being able to pull out a cozy soup on a dreary day is such a nice treat. We also love the Hearty Sausage Zucchini Soup, Curried Butternut Squash Soup, and our amazingly delicious Lasagna Soup.

Pesto Minestrone Recipe

Ingredients:

1 1/2 cups bowtie pasta
1 cup diced onion
2 cloves minced garlic
2 ribs of celery, chopped
3 carrots, sliced
1 cup white wine (or you can use apple juice)
14-19 ounce can diced tomatoes with juice
19 ounce can mixed beans
2 tablespoons tomato paste
2 teaspoons Italian seasoning
1/2 teaspoon black pepper
1/4 cup grated Parmesan cheese
1/4 cup basil pesto

For cooking day:

4 cups vegetable broth

Assembly Instructions:

  1. Place the dry bowtie pasta in a medium freezer bag and seal.
  2. In a separate, large freezer bag, add the diced onion, garlic, celery, carrots, white wine, diced tomatoes, mixed beans, tomato paste, Italian seasoning, black pepper, parmesan cheese, and basil pesto.
  3. Squish the large bag to combine the ingredients. Remove excess air from the inside of the bag and seal the top. Staple the bag of pasta to the large bag above the seal. Freeze both bags together.

ingredients for soup in a clear plastic bag

Cooking instructions:

  1. Transfer the minestrone soup ingredients to the refrigerator to thaw overnight.
  2. To prepare the soup on the stovetop, pour the contents of the large bag into a stockpot and add four cups of vegetable broth. Cook over medium high heat until the liquid begins to boil, then reduce the heat to medium low and simmer for 15 minutes.
  3. Add the pasta to the pot and continue to simmer the soup for another 10 minutes, until the pasta is tender, stirring the soup occasionally.
  4. To cook the soup in the crockpot, pour the contents of the large bag into the bowl of the slow cooker and add the vegetable broth. Place the lid on top and cook on low for four to six hours or high for two to three hours.
  5. Stir the pasta into the soup 20 minutes before serving.

collage of photos of minestrone soup from freezer bag to slow cooker to bowl

How Do You Thicken Minestrone Soup?

Since minestrone is made with a broth base, it has a soupy consistency. But the use of beans and pasta in this recipe help give the soup some thickness without the need to add any thickening agent to the pot.

If your minestrone is soupier than you prefer, the best way to help reduce the amount of liquid in the pot is allow the soup to simmer for longer. Increasing the cook time by around 30 minutes will give the excess liquid time to thicken and reduce, giving your minestrone a less runny consistency.soup being lifted from a bowl with a spoon

Soups are about the most comforty of the comfort foods when it comes to winter. See us make this Pesto Minestrone soup as well as some of our other most popular soup recipes in the video below.

Variations for Minestrone Soup:

  • Add more vegetables. If you’re looking to add more nutrition into your bowl, add cubed zucchini, frozen green beans, frozen peas, kale, spinach, or cabbage to the bag before freezing.
  • Change up the beans. Use cannellini beans (also known as white kidney beans) or kidney beans in place of the can of mixed beans if you prefer.
  • Extra protein. To add more protein, you can replace the veggie broth with chicken stock and top with Parmesan cheese.
  • Use different pasta. In place of the bowtie pasta, you can use any small pasta such as small shells or macaroni noodles.

bowl of soup with vegetables and bowtie pasta

bowl of soup with vegetables and bowtie pasta
Print
Pesto Minestrone
Prep Time
15 mins
Cook Time
30 mins
 
Course: Soup
Keyword: soup
Servings: 6
Ingredients
  • 1 1/2 cups bowtie pasta
  • 1 cup diced onion
  • 2 cloves garlic minced
  • 2 ribs of celery chopped
  • 3 carrots sliced
  • 1 cup white wine or you can use apple juice
  • 14-19 oz diced tomatoes with juice
  • 19 oz mixed beans
  • 2 Tbsp. tomato paste
  • 2 tsp Italian seasoning
  • 1/2 tsp black pepper
  • 1/4 cup Parmesan cheese grated
  • 1/4 cup basil pesto
For cooking day:
  • 4 cups vegetable broth
Instructions
Assembly Instructions:
  1. Place the bowtie pasta in a medium freezer bag
  2. In a separate large freezer bag, add the diced onion, garlic, celery, carrots, white wine, diced tomatoes, mixed beans, tomato paste, Italian seasoning, black pepper, parmesan cheese, and basil pesto.

  3. Squish to combine the ingredients. Remove excess air from the bag and seal. Staple the bag of pasta to the large bag above the seal. Freeze.

Stovetop Cooking instructions:
  1. Transfer the minestrone soup ingredients to the refrigerator to thaw overnight.
  2. Pour the contents of the large bag into a stockpot and add four cups of vegetable broth. Cook over medium high heat until the liquid begins to boil, then reduce the heat to medium low and simmer for 15 minutes

  3. Add the pasta to the pot and continue to simmer the soup for another 10 minutes, until the pasta is tender, stirring the soup occasionally.
Crock Pot Cooking Instructions:
  1. Pour the contents of the large bag into the bowl of the slow cooker and add the vegetable broth. Place the lid on top and cook on low for four to six hours or high for two to three hours.

  2. Stir the pasta into the soup 20 minutes before serving.

Filed Under: Freezer Meal Recipes, Freezer to Crock Pot Tagged With: soup, vegetarian

Baked Manicotti Freezer Meal

By Sharla

Baked pasta dishes are always a hit with the family, which means they’re great for adding to your weeknight meal plan. With the help of this easy baked manicotti recipe, you can prep your pasta dinner ahead of time and freeze it until you’re ready to start cooking. Your family will love these cheesy stuffed noodles covered in sauce, and you’ll love how simple this no boil dish is to prepare!casserole dish with manicotti in red sauce and two manicottis on a plateTo make this dish into individual freezer meals, divide it among smaller foil containers. It is a great one for making as a freezer meal for one.

We also enjoy this Mexican Manicotti Bake recipe for a bit of a change. It’s packed full of flavour.

Baked Manicotti Recipe

Ingredients:

  • 3 cups cottage cheese
  • 1 egg, lightly beaten
  • 1 1/2 cups mozzarella cheese, shredded
  • 1/2 cup Parmesan cheese, shredded
  • 1/4 teaspoon salt
  • 1/4 teaspoon pepper
  • 1/4 teaspoon nutmeg
  • 1 (8 ounce) box manicotti, uncooked
  • 6 cups pasta sauce

Assembly Instructions:

  1. Start by spreading one cup of pasta sauce on the bottom of a 9×13 pan.
  2. In a large bowl, mix the cottage cheese, egg, mozzarella cheese, Parmesan cheese, salt, pepper, and nutmeg. Using a piping bag, a spoon, or your fingers, stuff the cheese filling mixture into the center of the manicotti shells.
  3. Place stuffed manicotti on top of the pasta sauce that’s in the pan. Then pour the remaining sauce over the top of the pasta.
  4. Wrap the entire pan in plastic wrap and top the pan with foil. Label the pan and place it in the freezer until you’re ready to bake.
  5. Be sure to write a reminder to remove the plastic wrap before baking.

Cooking Instructions:

  1. Transfer the pan to the refrigerator to thaw overnight.
  2. When you’re ready to bake, preheat the oven to 350 degrees. Remove the foil and plastic wrap from the pan and replace the foil. Bake for 45 minutes.
  3. The dish can also be baked from frozen if you increase cooking time to 1 hour and 10 minutes.
  4. Remove the foil from the pan and continue baking until noodles are tender.

plate with two slices of bread, two manicotti, and salad

Is it Better to Freeze Manicotti Before or After Cooking?

Preparing pasta for freezer cooking can sometimes be confusing. While some pasta dishes require that you cook the noodles before freezing the dish, others don’t need to be boiled or baked before freezing. So how do you know whether you should cook the manicotti noodles before stuffing and freezing them?

The best way to figure out if your pasta needs to be cooked before freezing is to check the box. If you use no boil manicotti noodles, there is no need to pre-cook the pasta before placing the stuffed shells in the freezer. All you have to do is make sure the pasta is fully covered in sauce and they’ll soften as they bake in the oven.

But if your pasta is not no boil, you will need to prepare the noodles before you freeze them. No boil manicotti should be boiled until they are al dente. After that, allow the pasta to cool until it’s safe to touch and add the cheese filling before freezing your pasta dish.two manicottis on a plate next to salad and a slice of bread

How Long Does Manicotti Stay Fresh in the Fridge?

After your family enjoys your baked manicotti, you might have a few leftovers when dinner is over. Any leftover pasta should be stored in the refrigerator. You can cover the pan with plastic wrap and store it directly in the fridge. Or transfer the leftover pasta to an airtight container. When stored properly, your pasta will stay fresh for up to four days.

What is the Best Way to Reheat Manicotti?

When you’re ready to enjoy your leftover pasta, there are a couple of different ways you can reheat it. The best way to warm up your manicotti is to bake it in the oven. Place your leftover pasta in an oven-safe dish and cook it at 350° for 10 to 15 minutes, until the pasta is heated and the cheese is melted.

You can also reheat the leftover manicotti in the microwave. Heat the pasta for around one minute and check the temperature of the filling. If the center is still cold, return the pasta to the microwave and cook for an additional 30 seconds.manicotti being scooped up on a fork off a plate

Baked Manicotti Recipe Variation Ideas:

This quick and easy vegetarian lasagna is a great option for a meatless meal. But you can easily adjust the recipe to create a delicious dinner for your family with these simple additions.

  • Use a meat sauce. If your family prefers to have meat with their pasta, you can easily add cooked ground beef or Italian sausage to the pasta sauce. Simply stir one pound of prepared meat into the sauce before adding it to the pan.
  • Mix in some spinach. An easy way to add flavor and veggies to your pasta dinner is by mixing some spinach leaves into your cheese filling. You can use fresh or frozen spinach, depending on what you have on hand. If you plan to use frozen spinach, make sure to allow the vegetables to defrost before mixing them into the filling.
  • Boil the pasta. To help speed up the prep work on this baked pasta dish, try using no boil pasta. But if you can’t find that type of pasta in your grocery store, traditional manicotti noodles will work, too. To prepare this baked pasta dish with traditional noodles, make sure to boil the pasta before adding the filling. You’ll want to cook it to slightly underdone so that when reheating, the noodles don’t get mushy.
two manicottis on a plate next to salad and a slice of bread
Print
Baked Manicotti
Ingredients
  • 3 cups cottage cheese
  • 1 egg lightly beaten
  • 1 1/2 cups mozzarella cheese shredded
  • 1/2 cup Parmesan cheese shredded
  • 1/4 tsp salt
  • 1/4 tsp pepper
  • 1/4 tsp nutmeg
  • 8 oz manicotti uncooked
  • 6 cups pasta sauce
Instructions
Assembly Instructions:
  1. Spread one cup of pasta sauce on the bottom of a 9x13 pan.

  2. In a large bowl, mix the cottage cheese, egg, mozzarella cheese, Parmesan cheese, salt, pepper, and nutmeg. Using a piping bag, a spoon, or your fingers, stuff the cheese filling mixture into the manicotti shells.

  3. Place stuffed manicotti on top of the pasta sauce in the pan. Pour the remaining sauce over the top of the pasta.

  4. Wrap the entire pan in plastic wrap and top the pan with foil. Label the pan and place it in the freezer until you’re ready to bake.
Cooking Instructions:
  1. Thaw.

  2. Preheat the oven to 350°. Remove the foil and plastic wrap from the pan and replace the foil. Bake for 45 minutes.

  3. The dish can also be baked from frozen if you increase cooking time to 1 hour and 10 minutes.
  4. Remove the foil from the pan and continue baking until noodles are tender.

Filed Under: Freezer Meal Recipes Tagged With: pasta, vegetarian

  • Go to page 1
  • Go to page 2
  • Go to page 3
  • Go to page 4
  • Go to Next Page »

Primary Sidebar

  • Freezer Meals for One
  • Easy Tuna Casserole Freezer Meal
  • Ham and Cheese Sliders Make Ahead Sandwiches
  • Ground Beef Stroganoff Freezer Meal
  • Scrambled Egg Bites (freezer breakfast idea)
  • Easy Cheesy Tater Tot Chicken Casserole

Categories

Copyright © 2023 · Lifestyle Pro On Genesis Framework · WordPress · Log in · Privacy Policy