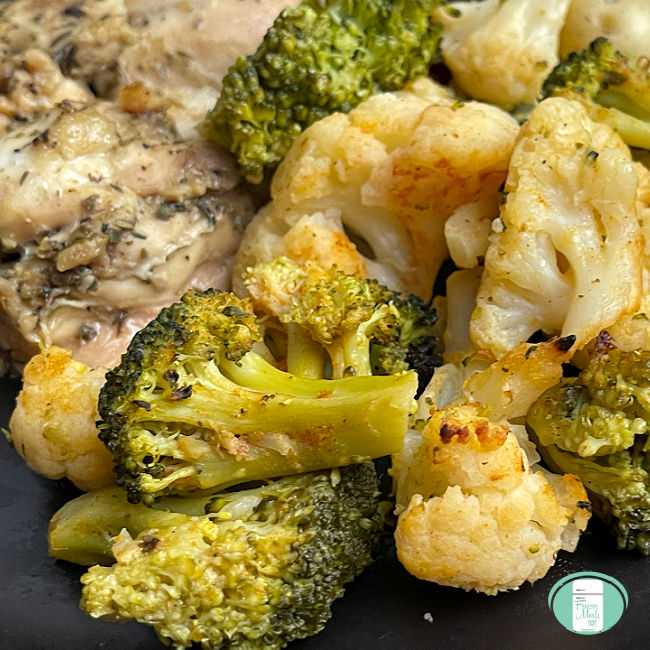
• Skip to main content
  • Skip to primary sidebar
  • About
    • Disclosure/PR
  • Freezer Meal Recipes
  • Freezer Meal Plans
  • Dump Recipes
  • Club Login

Freezer Meals 101

Less time cooking, more time living

keto

Scrambled Egg Bites (freezer breakfast idea)

By Sharla

It’s so nice to have breakfast foods in the freezer ready to go. These scrambled egg bites are great for busy weekday mornings. You can grab them on your way out the door for work or you can heat them up for the kids before school.

muffin tin with little omelettes and a hand holding an egg bite text that reads "Scrambled Egg Bites" #freezermeals101 #breakfast #scrambledeggbites The other thing I really like about this particular recipe is how many variations you can make of it. You can try different combinations until you find your favorite. You can also customize them for each person in the family.

This is a great recipe to have kids help with. It’s super easy and older kids can even make them on their own. They can add in the mix-ins they like best. Inviting the kids to participate in making the egg bites really allows them to explore their culinary creativity. It also makes them more likely to be willing to try new foods.

Scrambled Egg Bites Recipe:

Ingredients:

  • 12 eggs
  • salt and pepper
  • whatever you want to add in such as vegetables, meat, and shredded cheese

ingredients for scrambled egg bites; cheese, tomatoes, eggs, meat and green onionsAssembly instructions:

  1. Grease muffin tins with butter or cooking spray.
  2. Break one egg into each muffin tin.*
  3. Lightly whisk each with a fork to break the yolk.
  4. Sprinkle with salt and pepper.
  5. Drop-in your choice of mix-ins.
  6. Press the mix-ins down with a fork or spoon.
  7. Bake at 350° for 20-25 minutes.
  8. Cool.
  9. Place in a large, resealable freezer bag. Seal. Freeze.

*You can substitute egg whites if desired.

It’s important to allow the egg bites to cool before you add them into the bag or it will create moisture in the bag which will affect the texture of the egg bites. We learned this lesson the hard way.

collage of scrambled egg bites being put together, in a muffin pan and one held up with a bite out of itCooking instructions:

  1. Thaw.
  2. Reheat in the microwave on a paper towel or napkin. Cooking times vary depending on the microwave oven but approximately 1 1/2 to 2 minutes if frozen or 30 seconds if thawed.
  3. If you want, you can top the egg bites with salsa, some hot sauce, guacamole, or cottage cheese.

Suggestions for what to put in egg bites:

  • diced green or purple onions
  • chopped red or green pepper
  • diced tomatoes
  • pre-cooked deli ham
  • pre-cooked sausage
  • crumbled cooked bacon
  • cooked diced turkey
  • shredded cheese (cheddar, Gruyere, Swiss, jalapeño jack, or a blend)
  • feta or goat cheese
  • diced jalapeños
  • baby spinach
  • broccoli

close up of a scrambled egg bite being held up with a bite out of itIt can be difficult to get the egg bites out of the muffin tin cleanly, so be sure to grease the tin well. Alternately, you can use stoneware or a silicone mold. I usually use a stoneware muffin tin for mine and they come out beautifully.

My husband loves the egg bites at Starbucks, but he finds them a bit small. Also, Starbucks is a farther drive than our freezer! He’s loving having these handy whenever he wants to grab a quick breakfast. He is on again-off again with his Keto diet and these are low carb so he can eat them no matter what. 

Print
Scrambled Egg Bites
Prep Time
5 mins
Cook Time
23 mins
 
Course: Breakfast
Cuisine: American
Keyword: egg bites, scrambled egg bites
Servings: 12
Calories: 70 kcal
Ingredients
  • 12 eggs *You can substitute egg whites if desired.
  • salt and pepper
  • whatever you want to add in such as vegetables, meat, and shredded cheese
Instructions
Assembly instructions:
  1. Grease muffin tins.
  2. Break one egg into each muffin tin.*
  3. Lightly whisk each to break the yolk.
  4. Sprinkle with salt and pepper.
  5. Drop in your choice of mix-ins.
  6. Press the mix-ins down with a fork or spoon.

  7. Bake at 350° for 20-25 minutes.
  8. Cool.

  9. Place in large, resealable freezer bag. Seal. Freeze.

Cooking instructions:
  1. Thaw.
  2. Reheat in the microwave on a paper towel or napkin. Cooking times vary depending on your microwave oven, but approximately 1 1/2 to 2 minutes if frozen or 30 seconds if thawed.

  3. If you want, you can top the egg bites with salsa, some hot sauce, guacamole, or cottage cheese.

Recipe Notes

It's important to allow the egg bites to cool before you add them into the bag or it will create moisture in the bag which will affect the texture of the egg bites.

Suggestions for what to put in egg bites:
diced green or purple onions, chopped red or green pepper, pre-cooked deli ham, pre-cooked sausage, crumbled cooked bacon, cooked diced turkey, shredded cheese (cheddar, Gruyere, Swiss, jalapeño jack, or a blend), diced jalapeños, spinach, broccoli

Check out some of our other make-ahead breakfasts:

Everything Bagels Breakfast Muffinsclose up of a pile of everything bagel breakfast muffins

French Toast Casseroleclose up of french toast casserole

Pancake Mini Muffinsa plate with several pancake mini muffins and a cup of syrup on the side

Filed Under: Freezer Meal Breakfast Recipes, Freezer Meal Recipes Tagged With: breakfast, eggs, keto

Slow Cooker Ragu with Beef and Sausage

By Sharla

This Ragu with beef and sausage can be made ahead and frozen. It’s full of powerful flavors. This is a hearty meal that includes both meat and vegetables. white Crock Pot with chunky sauce and a ladle lifting some up with text that reads "Slow Cooker Ragu with sausage and beef" #freezermeals101 #ragusausagebeef #makeahead #slowcookerThis Ragu recipe makes a large amount. If you are cooking for 2 or for a small family, I would suggest splitting it into 2 freezer bags.

What is the difference between Ragu and a Bolognese sauce?

Ragu has more meat in it than Bolognese does and usually includes pork as well as beef. It also usually includes red wine and beef broth and sometimes has a small amount of heavy cream or milk in it as well.

Essentially, Ragu is more of a meat sauce with tomatoes while Bolognese is more of a tomato sauce with meat.

Ragu with Beef and Sausage Recipe:

  • 1 lb. ground beef, browned
  • 450 g ground Italian sausage, browned*
  • 1 onion, diced
  • 4 cloves garlic, minced
  • 1/2 a zucchini, chopped
  • red pepper, diced
  • 2x 28 oz. can diced tomatoes
  • 1 cup beef broth
  • 1/4 cup red wine
  • 1 tsp. oregano
  • 1 tsp. basil
  • 1/4 tsp. red pepper flakes
  • 1 tsp. salt
  • 1 tsp. pepper

optional:

  • basil and shredded Parmesan cheese for serving

*If you like things with a kick, you can use spicy Italian sausage.

Ragu with tomatoes, beef and sausage served on pasta with cheese and parsley on topAssembly instructions:

  1. Brown the ground beef and the sausage.
  2. Allow them to cool. Add them into a large resealable freezer bag.
  3. Chop the onion, zucchini, and red pepper. Mince the garlic.
  4. Add the chopped vegetables and all other ingredients to the bag. Squish to combine.
  5. Remove the extra air from the bag and seal before freezing.

collage of ragu with tomatoes, beef and sausage in the slow cooker, in a bowl and being lifted on a fork from a dish with pastaSlow Cooker Cooking Instructions:

  • Take the bag out of the freezer to thaw.
  • Dump the bag contents into the crockpot.
  • Cook on high for 2-4 hours.
  • Serve over noodles or rice.
  • If you want, you can sprinkle fresh basil and shredded Parmesan cheese on the plates before serving.serving spoon lifting ragu beef and sausage out of a slow cooker

This recipe is gluten-free and keto-friendly. Of course, you’ll need to serve it over a pasta alternative such as spiralized vegetables for it to be fully gluten-free and keto!

Print
Ragu with Beef and Sausage Recipe
Course: Main Course
Cuisine: Italian
Keyword: beef, Ragu, sausage
Servings: 6
Calories: 332 kcal
Ingredients
  • 1 lb. ground beef browned
  • 450 g ground Italian sausage browned*
  • 1 onion diced
  • 4 cloves garlic minced
  • 1/2 zucchini chopped
  • red pepper diced
  • 2 28 oz. cans diced tomatoes
  • 1/4 cup red wine
  • 1 cup beef broth
  • 1 tsp. oregano
  • 1 tsp. basil
  • 1/4 tsp. red pepper flakes
  • 1 tsp. salt
  • 1 tsp. pepper
Instructions
Assembly instructions:
  1. Brown the ground beef and the sausage.
  2. Let them cool. Add them into a large resealable freezer bag.
  3. Chop the onion, zucchini, and red pepper. Mince the garlic.
  4. Add the chopped vegetables and all other ingredients to the bag. Squish to combine.
  5. Remove the extra air from the bag and seal before freezing.
Cooking instructions:
  1. Take the bag out of the freezer to thaw.
  2. Dump the bag contents into the crockpot.

  3. Cook on high for 2-4 hours.
  4. Serve over noodles or rice.
Recipe Notes

*If you like things with a kick, you can use spicy Italian sausage.

Some of our other recipes you may enjoy:

Italian Sausage Pasta Sauce close up of Italian sausage pasta sauce served on spaghetti

Irresistible Chicken Pasta Bake close up of irresistible chicken pasta bake with lots of noodles and herb garnish

Filed Under: Freezer Meal Recipes, Freezer to Crock Pot Tagged With: beef, gluten free, keto, ragu, sausage

Buffalo Ranch Cauliflower and Broccoli Freezer Side Dish

By Sharla

It is so nice to be able to pull a side dish out of the freezer. More and more, I’m finding that I am making sides when we do our freezer meal sessions. This Buffalo Ranch Cauliflower and Broccoli recipe is simple, yet handy to have.

This side dish is low carb, keto-friendly, and gluten-free. My husband is on a keto diet on and off, so I’m always on the lookout for keto recipes like our Lemon Mustard Chicken, Tequila Lime Shrimp, and Instant Pot Bone Broth. It’s nice to have these vegetables that can easily go with those meals.

roasted broccoli and cauliflower are on a blue plate with fish and white rice with text that reads "Buffalo Broccoli and Cauliflower make ahead side dish" #freezermeals101 #ketovegetables #ketofreezermeal #broccolicauliflower #makeahead

Even though this recipe uses hot sauce, the end result isn’t very spicy because it’s offset by the Ranch. This makes it a bit more kid-friendly…that is of course if you can get your kids to eat broccoli and cauliflower!

When our kids were younger, we called them “trees” and “winter trees”. That seems to go over a bit better. They actually seemed to want to eat their “mini trees”, well, until after that first bite anyway!

Buffalo Ranch Broccoli and Cauliflower Recipe:

Ingredients:

  • 3 1/2 cups each cauliflower and broccoli florets (fresh or frozen)
  • 2-3 Tbsp. Frank’s Red Hot sauce
  • 2 Tbsp. olive oil
  • 3 Tbsp. dry Ranch dressing mix

Assembly instructions:

  1. In a large bowl, toss the cauliflower and broccoli with the hot sauce, olive oil, and dry dressing mix.
  2. When the vegetables are well coated, spread them out in a single layer on a baking sheet. Freeze for about 45 minutes and then transfer them into a large resealable bag*. Remove the excess air and freeze.

*Pro-tip: We like to buy the broccoli and cauliflower frozen in resealable bags from the store. That way, after we assemble this dish, we can put the vegetables back into those same bags, reseal, and store them in the freezer. From the outside, it will just look like a bag of frozen broccoli and cauliflower, but it will already be seasoned and ready to cook. You can label it with a permanent marker if you want. I like reusing the bags because it creates less waste.

collage of buffalo ranch cauliflower and broccoli side dish on a plate as well as served with meat and riceCooking instructions:

  1. Preheat the oven to 425°. Line a baking sheet with parchment paper.
  2. Place the frozen broccoli and cauliflower in a single layer on top.
  3. Bake for 10 minutes. Flip the vegetables over and place them back in the oven for another 20 minutes.
  4. Serve beside your favorite main dishes or as a potluck side dish.close up of buffalo ranch cauliflower and broccoli side with rice and fish

What to serve the buffalo broccoli and cauliflower with:

  • Chili Lime Tilapia (pictured)
  • Country Style Ribs
  • Honey Sesame Chicken
  • Apple Pork Chops
  • Maple Dijon Salmon
  • Simple Marinated Pork Chops
  • Lemon Garlic Chicken
  • Classic Sunday Pot Roast
  • Puerto Rico Fried Chicken
  • Sweet and Spicy Meatballs
Print
Buffalo Ranch Cauliflower and Broccoli
Prep Time
5 mins
Cook Time
20 mins
 
Course: Side Dish
Keyword: broccoli and cauliflower, buffalo cauliflower
Servings: 4
Calories: 83 kcal
Ingredients
  • 3 1/2 cups each cauliflower and broccoli florets fresh or frozen
  • 2-3 Tbsp. Frank's Red Hot sauce
  • 2 Tbsp. olive oil
  • 3 Tbsp. dry Ranch dressing mix
Instructions
Assembly instructions:
  1. In a large bowl, toss the cauliflower and broccoli with the hot sauce, olive oil, and dry dressing mix.

  2. When the vegetables are well coated, spread them out in a single layer on a baking sheet. Freeze for about 45 minutes and then transfer them into a large resealable bag*. Remove the excess air and freeze.

Cooking instructions:
  1. Preheat the oven to 425°. Line a baking sheet with parchment paper.

  2. Place the frozen broccoli and cauliflower in a single layer on top.

  3. Bake for 10 minutes. Flip the vegetables over and place them back in the oven for another 20 minutes.

  4. Serve beside your favourite main dishes or as a potluck side dish.

Recipe Notes

*Pro-tip: We like to buy the broccoli and cauliflower frozen in resealable bags from the store. That way, after we assemble this dish, we can put the vegetables back into those same bags, reseal, and store them in the freezer. From the outside, it will just look like a bag of frozen broccoli and cauliflower, but it will already be seasoned and ready to cook. You can label it with a permanent marker if you want. 

Check out these other make-ahead side dishes:

Garlic Breadclose up of a loaf of garlic bread sliced up on foil

Honey Maple Glazed Carrotscollage of honey maple glazed carrots being put in freezer bags

Rice Pilafclose up of rice pilaf in a bowl

Filed Under: Freezer Meal Recipes, Freezer Meal Side Dishes Tagged With: broccoli, buffalo, cauliflower, gluten free, keto

Dill Salmon Freezer Meal

By Sharla

The pictures of this Dill Salmon don’t do it justice. It is flaky and flavourful and delicious. It is one of our favourite freezer meals. You won't believe this Dill Salmon is a Freezer Meal! #freezermeals101 #freezercooking #makeaheadmeals #salmon #easyrecipes #yum

This is so incredibly fast to put together. It bakes in less than half an hour, making it such an easy recipe. If you are new to freezer meals, this is a great one to start with.

Our nickname for this one is Salmon Dilly. I’m not sure where the name came from, but it’s stuck. When I say that we’re having Salmon Dilly for supper, everyone knows what I mean.

Dill Salmon Recipe:

  • 1 1/2 lbs. salmon fillets (pin bones removed)
  • 1/2 cup sour cream
  • 1/2 cup mayonnaise
  • 2 Tbsp. dried dill
  • 3 cloves garlic, minced
  • 1/4 cup lemon juice

Assembly instructions:

    1. Place the salmon in a large resealable freezer bag or a reusable silicone bag.
    2. In a small bowl, combine the other ingredients.
    3. Pour in the bag and squish around to coat the salmon.
    4. Remove excess air from the bag, seal and freeze.

collage of salmon with dill in the freezer bag and plated with potato saladCooking instructions:

  1. Thaw.
  2. Bake in a 350° oven for 25 minutes on a foil-lined cookie sheet.

Using tin foil on the baking sheet makes clean up a breeze!

Side Dish Ideas for Salmon:

  • wild rice
  • potato salad (pictured)
  • make ahead rice pilaf
  • broccoli slaw
  • pea salad
  • arugula parmesan pine nut salad
  • summer quinoa salad
  • sautéed zucchini with walnuts and cranberries
  • roasted Ranch broccoli
  • lemon rice (the flavour of the lemon goes nicely with the dill)
  • parmesan asparagus

This Dill Salmon recipe is included in our More Family Favourites Freezer Meal Plan. Along with other easy recipes, it also includes printable shopping lists and labels. 

Print
Dill Salmon Recipe
Course: Main Course
Keyword: dill, salmon
Servings: 6
Calories: 373 kcal
Ingredients
  • 1 1/2 lbs. salmon fillets pin bones removed
  • 1/2 cup sour cream
  • 1/2 cup mayonnaise
  • 2 Tbsp. dried dill
  • 3 cloves garlic minced
  • 1/4 cup lemon juice
Instructions
Assembly instructions:
  1. Place the salmon in a large resealable freezer bag or a reusable silicone bag.
  2. In a small bowl, combine the other ingredients.
  3. Pour in the bag and squish around to coat the salmon.
  4. Remove excess air from the bag, seal and freeze.
Cooking instructions:
  1. Thaw. Bake in a 350° oven for 25 minutes on a foil -ined cookie sheet.

Filed Under: Freezer Meal Recipes Tagged With: dill, keto, salmon

Taco Breakfast Cups You Can Make Ahead

By Sharla

Mornings are a madhouse around here. With so many kids and some of them going to different schools, it’s complete chaos on weekdays between 6 a.m. and 8:10! Having ready-to-go breakfasts like these taco breakfast cups make mornings so much easier.

These on the go breakfast taco cups make busy weekday mornings so much easier! #makeaheadbreakfast #breakfastrecipes #freezermeals101 #easyfamilymeals #feedingkidsIf you’re really in a rush, you can even wrap these in a paper towel and eat them on your way out the door.

These breakfast cups are gluten-free,

Taco Breakfast Cups Recipe:

  • 6 green onions, diced
  • 1 red pepper, diced
  • 1 yellow or orange pepper, diced
  • 6 eggs, beaten
  • 1/2 cup milk
  • 2 tsp. taco seasoning
  • 1/2 lb. spicy ground turkey sausage
  • tex mex or taco shredded cheese
  • optional: salsa for dipping close up of breakfast taco cups piled up
  1. Preheat the oven to 350°.
  2. Generously grease a muffin tin.
  3. Brown the turkey sausage in a skillet with the taco seasoning mixed in.
  4. Dice the green onions and peppers. Place a spoon full of the diced vegetables in the bottom of each greased muffin tin.
  5. Next, layer a spoon of turkey sausage on top.
  6. In a small mixing bowl, mix together the beaten eggs and milk.
  7. Fill each of the muffin tins to the top with the egg mixture.
  8. Bake for 10-15 minutes, until cooked through.
  9. Top each one with grated cheese and put it back in the oven just until the cheese is melted.
  10. Eat immediately or allow to cool before placing the egg cups in a large resealable bag and freezing.
  11. To reheat, take out as many egg cups as you need. Wrap the egg cup in a paper towel and place it on a plate. Heat in the microwave just until warm.*
  12. If you want, you can dip these in salsa.

*I find that if you reheat them in the microwave without using a paper towel, they get a bit soggy. No one wants soggy eggs, so be sure not to skip this step.  making on the go breakfast taco cups, layering ingredients in the panIf you substitute whipping cream for the milk, then these taco breakfast cups are keto-friendly. They are also gluten-free provided you use gluten-free taco seasoning.

You’ll love these grab-and-go bites for busy mornings. It’s easy to customize them to your taste. If you like things spicy, you can add some chopped jalapenos with the other peppers. You can also choose to substitute spicy ground Italian sausage in place of the turkey if you prefer. collage of piled up on the go breakfast taco cupsSome of our other make-ahead breakfasts:

Make-Ahead Cinnamon French Toast collage of make-ahead cinnamon french toast for breakfast or snack

Breakfast Sausage Hand Pies collage of breakfast sausage hand pies

Print
Taco Breakfast Cups Recipe
Course: Breakfast
Cuisine: Mexican
Keyword: eggs, taco
Servings: 6
Calories: 211 kcal
Ingredients
  • 6 green onions diced
  • 1 red pepper diced
  • 1 yellow or orange pepper diced
  • 6 eggs beaten
  • 1/2 cup milk
  • 2 tsp. taco seasoning
  • 1/2 lb. spicy turkey sausage
  • tex mex or taco shredded cheese
  • optional: salsa for dipping
Instructions
  1. Preheat the oven to 350°.
  2. Generously grease a muffin tin.
  3. Brown the turkey sausage in a skillet with the taco seasoning mixed in.

  4. Dice the green onions and peppers. Place a spoon full of the diced vegetables in the bottom of each greased muffin tin.

  5. Next, layer a spoon of turkey sausage on top.

  6. In a small mixing bowl, mix together the beaten eggs and milk.

  7. Fill each of the muffin tins to the top with the egg mixture.

  8. Bake for 10-15 minutes, until cooked through.
  9. Top each one with grated cheese and put them back in the oven just until the cheese is melted.

  10. Eat immediately or allow to cool before placing the egg cups in a large resealable bag and freezing.

  11. To reheat, take out as many egg cups as you need. Wrap the egg cup in a paper towel and place it on a plate. Heat in the microwave just until warm.

Recipe Notes

I find that if you reheat them in the microwave without using paper towel, they get a bit soggy. No one wants soggy eggs, so be sure not to skip this step.

Filed Under: Freezer Meal Breakfast Recipes, Freezer Meal Recipes Tagged With: breakfast, eggs, gluten free, keto

  • Go to page 1
  • Go to page 2
  • Go to Next Page »

Primary Sidebar

  • Freezer Meals for One
  • Ham and Cheese Sliders Make Ahead Sandwiches
  • Easy Tuna Casserole Freezer Meal
  • Ground Beef Stroganoff Freezer Meal
  • Scrambled Egg Bites (freezer breakfast idea)
  • Freezer Friendly Lazy Chicken Parmesan Casserole

Categories

Copyright © 2023 · Lifestyle Pro On Genesis Framework · WordPress · Log in · Privacy Policy